Is Oven Canning Safe?
Is Dry Oven Canning Safe?
The answer is NO. As Wise Geek so elegantly explains this…
Oven canning is not safe because it is a dry heat and the jars are not made for that. They can explode. Contamination is the main fear when it comes to dry canning. In order for food to be shelf-stable, it must be heated to a hot enough temperature that any latent bacteria in the food is killed off. The premise behind dry canning is usually sound, as a 200°F oven is generally hot enough to be considered sterile. Not all oven thermometers are accurate, however, and it can be tough for home cooks to know whether the external temperature is actually penetrating the jars.
There is no way for cooks to test the internal jar temperature without removing the lids and compromising the food. Any bacteria that remains in sealed jars can grow into toxins over time, which can cause serious food poisoning once the contents is eventually consumed. Sometimes spoiled food looks discolored or has an unpleasant taste, but not always.
CANNING OF MEAT AND OTHER ITEMS
Home canning is a popular way to preserve everything from fruits and vegetables to soups and stews. You can can and preserve foods you cook for dinner just by doubling and tripling the recipe and canning the leftovers. The items you can can to preserve is as large as your imagination will allow you to go!
Water Bath versus Steam Canning:
· A water bath canner is a large, deep pot with a lid and a rack to hold jars. The pot must be large enough to fit the canning jars plus water to cover the jars by 1 to 2 inches. The water boils rapidly during the canning process, and the canner must be large enough to prevent the water from boiling over the sides of the pot.
· A steam canner is a shallow pan with a rack that is covered by a high-dome lid that resembles a large pot turned upside-down. A small amount of water is poured into the base and brought to a boil. The canning jars are placed on the rack and covered with the lid. The canner fills up with steam, heating the jars and food.
· Because the jars are submerged in boiling water in a water bath canner, the temperature inside the jars reaches and stays at a steady 212 degrees Fahrenheit, a sufficient temperature to kill harmful microorganisms in high-acid foods like fruits and pickles. Although the steam canner uses less water, which takes less time to come to a boil than the large amount of water in a water bath canner, the steam is not as hot as the boiling water and may not heat the jars and food sufficiently.
|
|
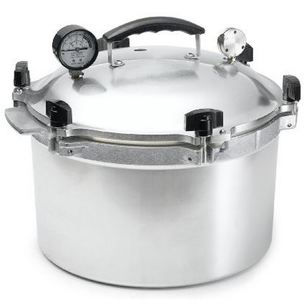
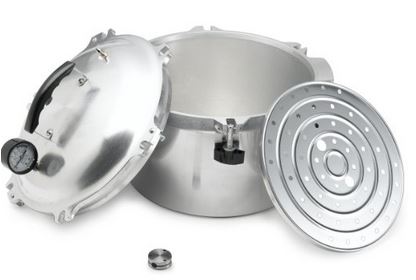
All-American Pressure Cooker - Comes from 10.5 qt. to 41.5 qt. Made in America, the
- 15-1/2-quart pressure cooker/canner holds 10 pint jars or 7 quart jars
- Made of durable, hand-cast aluminum with attractive satin finish
- Exclusive "metal-to-metal" sealing system for a steam-tight seal; no gaskets
- Geared steam gauge, automatic overpressure release; settings of 5 psi, 10 psi, and 15 psi
- 7-1/2 inches high with 12-1/2-inch inside diameter; made in USA
Caution: The USDA does not recommend a steam canner for safe canning of any food. For high-acids foods, reach for the water bath canner for safe processing. However, low-acid foods such as vegetables, meats and soups need even high temperatures for safe processing and should only be processed in a pressure canner.
LEARNING THE BASICS:
1. Request info from your local cooperative extension. All states offer cooperative extension services through their public universities. The cooperative extension is a treasure trove of free print information and low-cost workshops on vegetable gardening, raising animals for meat and home food preservation. They can also tell you what you are allowed to do in your area governed by local and state laws.
2. Make sure you always properly sterilize all your canning jars and lids before use. Fill a large stockpot with enough water to cover the canning jars. Bring the water to a boil on the stovetop over high heat. Wash the canning jars with warm water and mild dish soap. Rinse the canning jars well after you wash them. Place the lids, jars and rings into the boiling water with tongs. Add more water if the jars are not fully submerged. Boil the canning jars, lids and screw rings for 10 minutes if you're less than 1,000 feet above sea level--the University of Missouri Extension recommends that if you're above 1,000 feet, add another minute for each 1,000 feet above sea level. Carefully remove them from the boiling water with the tongs and
place the jars on a clean, dry towel. (Actually, it is just like doing baby bottles but on a smaller scale).
3. Regardless of which canning method or type of canner you use, there are a few fundamentals you must observe. Select only the best and freshest produce for canning, as ripe as you would choose for eating. Sterilize your canning jars and lids before using them, and use brand-new lids every time to ensure a good seal. Check the lip of each jar for chips or abrasions that might keep them from sealing, and always wipe the rims after filling your jars. Leave one inch of air space at the top. Tighten the lids finger-tight before loading the jars into the rack of your canner.
4. Water-bath processing is the simplest form of canning. Pack the food into your sterilized jars, seal them and cover them with hot water. Boil the water as directed in your recipe, which heats the contents of the jars to a food-safe temperature. When the jar cools, the air in the jar contracts and forms a vacuum, sealing it from outside air. Water-bath canning is only safe for foods with a high level of acidity, expressed as a pH of 4.6 or lower. This includes most fruit, pickles and vegetables such as tomatoes.
5. Prepared foods, meats and other foods with low acidity can't be preserved in a water-bath canner, because acidity will kill botulism spores but boiling temperatures will not. A pressure canner creates an artificial environment that forces water above its normal boiling temperature, killing the spores and making the food safe for long-term storage. This is done by locking down the canner lid to make an airtight seal, and using pressurized steam to raise the canner's internal pressure by 10 psi or more, as needed. After processing the food, you cool the pot until you can safely break the seal.
6. The cold-packing technique is one way to prepare foods for canning by either the water bath or pressure-canning method. Cold-packing means that you do not cook the food in its packing liquid before placing it in the jars. Cold-packed foods are more prone to spoilage and discoloration than hot-packed foods, but advocates of cold-packing feel it results in a fresher, more natural flavor. Check the USDA's home canning guide, or another authoritative source, before cold-packing any fruit or vegetable. Not all produce can be used with this method.
7. Hot packing is a more widely used technique for preserving foods. It simply means that the foods being preserved have been poached for a few minutes in their syrup before canning. Hot-packing helps eliminate air from the fruit, leaving it less prone to spoilage. Hot-packed foods are also less prone to floating in the jars, which raises the ends of the food out of the syrup or brine and leads to discoloration.
8. Processing: Properly processing your food using a recipe and the correct canning method (water-bath canning or pressure canning) is key to a lasting shelf life. When you follow the method correctly, heat-processing will destroy normal levels of micro-organisms. The vacuum seal that is formed on a properly canned jar will ensure that other micro-organisms do not find their way into the food.
9. James, Jellies & Preserves: Most jams and jellies that were processed properly will retain their flavor and quality for one year. After this time the color may start to change, depending on what kind of fruit you used to make the jam or jelly. Light-colored preserves like peach or apple jelly will begin to darken. The discoloration won't affect the taste, but some people may find it unappealing.
10. High Acid Foods: High-acid canned foods like tomatoes, tomato sauce, fruits and pickles or other vinegar-based foods are good for one year. After that period, the quality deteriorates. If the food was properly processed, there are no visible signs of mold or spoilage and if the food smells fine it should be safe to consume, but the contents may not taste as fresh.
11. Low Acid Foods: Low-acid canned foods include meats, soups, stews, pumpkin, carrots and peas. The pH level of these canned goods is 4.5 or lower, which means they have a longer shelf life. Typically they will safely last from two to five years. However, it is best to use them within one year for optimum flavor and quality.
12. Storage Tips: Properly storing your home-canned goods can prolong their shelf life and keep them tasting good. It is recommended that you keep your canned goods on a shelf in a clean, cool, dry spot. A cupboard is ideal. Light causes food to change color and it can also contribute to nutrient loss. The temperature should stay in the range of 60 to 70 degrees Fahrenheit. At temperatures above 75 degrees, food will start to lose nutrients, no matter how well preserved it is. As temperatures rise, the risk of spoilage becomes greater.
More Warnings: Before you open your home-canned goods, it is important to check for spoilage. Look for any signs of mold. Examine the metal tops and rings on canning jars for rust. If you see either of these things, throw the entire jar away. If the food has a strange odor when you open the can, discard it. Bad smells can be signs of bacterial growth.
Always remember to keep tracking of the canning dates of your foods - keep a list and put labels on your jars. Better safe than sorry is always the best motto when you have canned your own food. This will also apply when freezing your own foods.
